Coffre au Trésor
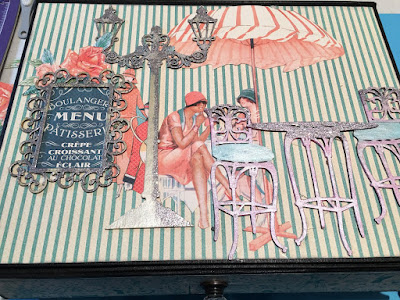
Hello! Thanks so much for stopping by! I'm sharing this coffre au trésor (that's French for treasure chest or box) that I created. I'm up on the Gypsy Soul Laser Cuts blog today with a tutorial on how to finish/prep the chipboard pieces that I used in the scene that I placed on the lid of my box. The Gypsy Soul Laser Cuts chippies are fabulous for adding in with your fussy cut papers to add dimension to your project. Here I've used their cafe table & chairs with the fancy lamp post and filigree frame. If you haven't worked much with chipboard pieces, you should give it try. It's so easy and every day on the GSL blog there is a new post with a new craft idea or technique on the chipboard sets you can buy at their online store.
I created my treasure box out of some chipboard using gaffer's tape and patterned it with the most beautiful Graphic 45 Cafe Parisian 12x12 paper collection. I added a Tim Holtz glass knob to the flap that opens up. I plan on creating a matching mini album to put inside my coffre au trésor.
You will find my tutorial and more photos of this box on the Gypsy Soul Laser Cuts blog today. I hope you stop by and leave me some comment love here and over at GSL.
Edited to add: I've included the step-by-step tutorial and supply list here in this post.
Step 1: Lay out your selected chipboard pieces on to a craft mat.
Step 2: Use a sponge dauber to add two coats of white Gesso to each chipboard piece. Allow to dry completely.
Step 3: Select the colors you'd like to use for different parts of the chipboard such as a mint green for the chair cushions, pink for the table & chairs, platinum for the lamp post and gold for the frame as shown below. I used Nuvo Embellishment Mousse and rubbed the color on with my fingers.
Step 4: Use embossing ink and different glitter embossing powders such as white, silver and gold to had some sparkle to different areas of the chippies. Set with your heat gun.
Step 5: Fussy cut out your paper elements and then lay them out along with the chippies to the top of your box for your final placement. Move them around as desired before permanently attaching them down with a wet glue.
Step 6: Use foam squares or small pieces of chipboard to layer up the different pieces and to add dimension. I created a cafe scene on the lid of my box.
Step 7: Use Wink of Stella Clear pen to add some sparkle to the leaves and flower petals and different areas of the scene. If desired, use Glossy Accents to cover the area of the sign to give it a glass look. Allow to dry completely.
And that's it! You have a beautifully altered and decorated box to store photos, jewelry or other treasures. My box opens from the top with magnetic closures and a glass knob pull. I will be making a mini album that will fit inside this box.
Supply List:
- Gypsy Soul Laser Cuts Cafe Table & Chairs Set
- Gypsy Soul Laser Cuts Filigree Frames Shape Set
- Gypsy Soul Laser Cuts Fancy Lamp Post & Sconce Set: Large
- Graphic 45 Cafe Parisian 12x12 Paper collection
- Box to Alter
- White Gesso & Foam Applicator
- Nuvo Embellishment Mousse
- Embossing Ink
- Embossing Powders (Metallic Gold, Silver, White)
- Heat Gun
- Wet Glue
- Foam Squares
- Scisssors
- Glass Knob (Tim Holtz)
- Wink of Stella Pen, Clear
- Glossy Accents
Happy Crafting!


