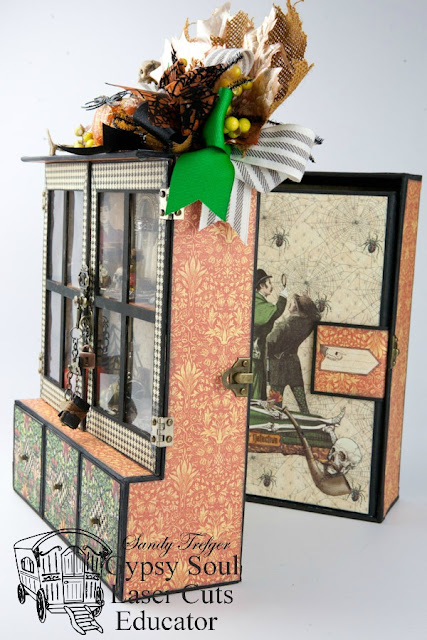
Master Detective Curio Cabinet {Again} with the Box Compartment for GSL
I know I've already shared this last week and maybe the week before but I do want to share it again for those who may pop in from Gypsy Soul Laser Cuts. This shows the add-on box for the China Cabinet chipboard kit you can order from Gypsy Soul Laser Cuts. The cabinet is kit # B4A and you order the add-on box separately which is not in the store yet but you can contact Gina via the store and request the price and add it to your order. I've already ordered and received mine for my class that I will be teaching this September at Flossie Scrapper. Now, in this photo with the back opened, you also see my folio album that I designed to fit in the box. It is not available through GSL. It's an album I custom designed for Graphic 45. Scroll through my older blog posts for more information on that.
So, I am up on the Gypsy Soul Laser Cuts blog today with details on how I added the box to the back of my cabinet. Do check it out and let me know here and there that you stopped by.
If you're not really into the spooky, Halloween type projects, this project will look fabulous in any paper collection!
Happy Crafting!
Sandy
For the instructions on how to add the add-on box to the curio cabinet, click >HERE< for my Gypsy Soul Laser Cuts Blog post with instructions. I've also added the instructions here in this blog post.
Supplies Used:
- Gypsy Soul Laser Cuts China Cabinet # B4A
- Gypsy Soul Laser Cuts Bonus Box for the #B4A China Cabinet - Custom Item, Contact the Store
- Black 12 x12 Cardstock
- 12" Trimmer
- 12" Score Board and Bone Folder
- Art Glitter Designer Glue (White Glue)
- 3-in-1 Glue
- Glossy Accents
- Black Masking Tape
- 3/8" Scor-tape
- Clear Transparency Sheets
- Black Ink and Foam Applicator
- Halloween embellishments
- Assorted Ribbons-4 to 6 different colors and designs
- Basic Grey Magnet Snaps, small
- Metal hinges - 2 small and 2 mediuim
- Metal Latch - 1
- Small Brads and Large Brads
- Eyelets
- Assorted charms & chains
- Prima Flower
- Steampunk bottles and other embellishments
- Tim Holtz Mini Bottles
- Assorted Miniature Items
- Tim Holtz Door Knob (for decorative item inside cabinet)
- Fall Leaves and Mini Pumpkin Floral Pick
Let's get started!
Step 1: Layout out your chipboard pieces for the box as shown. Make sure to use a damp cloth or baby wipe to clean the laser residue from the edges.
Step 2: Apply glue to the notches of the sides and ends and bring them up to form the box as shown below. Allow the glue to dry well.
Step 3:If you are using the black cardstock structure hinges to finish the edges of your box, cut several from 12x12 sheets as shown.They will need to be 12" long x 1" wide, scored on the 1" side at 1/2". You will measure the box and cut the lengths to fit as needed.
Step 4: Apply glue or scor-tape to one side of the hinges on each 1/2" section. And attach a hinge to all the edges as shown on the inside and outside of the box. If you do not want to use structure hinges and you have assembled/glued the box together well, you can choose to paint all the seams and edges black.
When finished attaching the structure hinges, your box will look like the photo below or all the black hinge areas will be painted black if you went with that option.
Step 5: Pattern the outside of your box and carefully line it up with the curio cabinet. Use a ruler and marker to mark the placement holes for your hinges.
Step 6: Drill or punch the holes that you marked and use Glossy Accents plus brads to attach the hinges to the box and the cabinet. Carefully open up the prongs on the inside of both the box and cabinet. Make sure they are tight and use a bit of Glossy Accents to secure if needed. You will add two hinges on the same side. Also use a marker to mark the holes for the latch on the other side. Drill or punch holes and attach the same way by adding Glossy Accents and brads. When looking at the front of the cabinet, I put the hinges on the left side and the latch on the right side.
Step 7: Once the hinges and latch are securely on the box and cabinet, you can go ahead and pattern the back of the cabinet and the inside of the box. If you haven't already, you will also want to pattern the back of the box on the outside.
The curio cabinet with the secret storage compartment is now completed. When you open it up from the back, you have a 3 inch space to create a custom album to store inside. Make sure that you don't create an album that is too thick as you do want your cabinet and storage box to close up properly.
The photo below shows the curio cabinet with the back opened up and a glimpse of the album I created for Graphic 45 and added to the inside.
Finish up your cabinet by adding decorative elements to the inside such as small bottles, skulls, miniature items, photos, clocks, mirrors, etc. On the knobs of the doors you can hang chains, padlocks, a sign, metal key and other charms. On the top, add a junk bow with floral pieces and if desired like mine, a spooky skeleton.


